Check out our Youtube video on building on horse wire fence, or read on about the process.
Our rescue dog, Kona, is a 90 lb mutt that has been compared to a tank, horse, cow, bull… in other words, he’s big. He’s also really stubborn and struggles with separation anxiety. We need a back yard to allow him to roam during the day, use the restroom, or hang out when we’re not home. We tried to let him in the house once, but he ended up eating two backs of tortilla chips and two bags of hot dog buns by the time we got back less than an hour later.
Our new home in Washington did not have a back yard so that was first on the list of projects. Since we needed it quickly (as Kona also does not like going potty while on a leash) and cheaply, we researched our options and selected a design with horse wire panels. Our site is too slopey for us to buy pre made panels so we did it ourselves.
How to Build a Horse Wire Fence
Even though we’re not experts, here’s how we decided to build our horse wire fence.
Start with Digging Post Holes
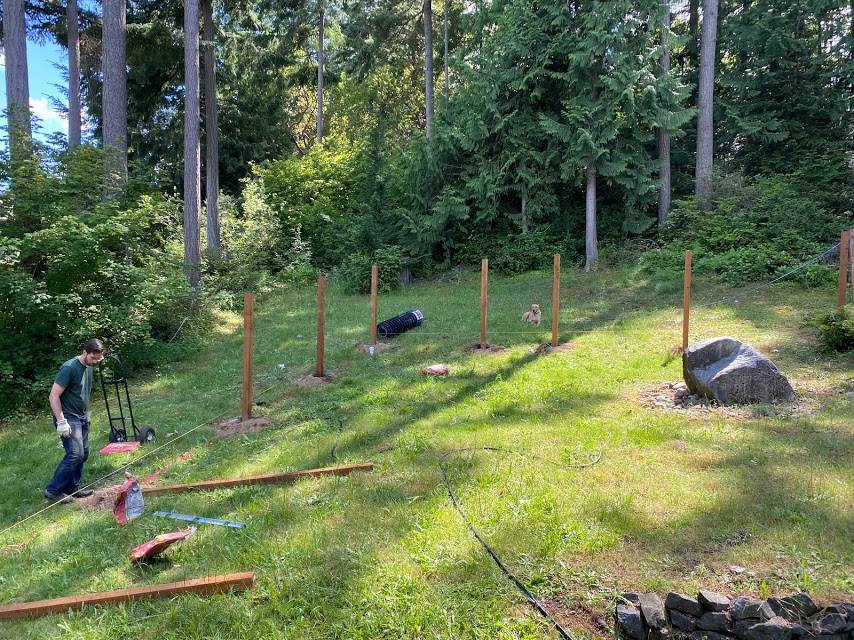
To start spacing out our posts, we broke out a tape measure, spray paint, and a line of string. We only had to build a “L” shape with our fence, with the house forming one wall and an exiting fence forming the rest of the enclosure. We staked a piece of rebar into the far corner, tied it off with string, then painted in where we wanted our posts at eight feet on center, except where we wanted four foot gates.
To save ourselves time and energy, we rented a one-man auger from the local big box hardware store. My back was killing me from the move, so Phil was on his own to do the heavy lifting. He was able to dig our thirteen postholes so much faster than using a manual post hole digger. Unfortunately, there were a few holes that had a ton of rocks. When the auger bit hit a rock that was too big, the bit would stick and the motor on top would spin. Phil’s shoulder got jerked pretty hard, leaving him super sore and tired.
For the remaining post holes, we borrowed a post hole digger from our neighbors. We used a pike to break up some rocks while digging out the rest of the dirt with the post hole digger. Finally, we got the holes dug about 2′ deep each, ready to dump in concrete and set the posts.
Setting Posts in Concrete
After we got all the holes dug, we set the posts in concrete. We bought quick setting concrete that would set solid in about 30-45 mins. For our posts, we dumped a little concrete in the bottom of the hole, wetted it down, then lowered the posts down.
To make sure the posts were level, we broke out a level and checked on two sides of the post. I held the posts level while Phil poured in the rest of the concrete and wetted it down. While the mix said you didn’t have to mix it, we still used the hose and a piece of rebar to kind of mix the concrete together the hole.
Even before we were done with the second post, the first post was halfway set. While this helped us build the fence faster, it also meant we had little room for errors. For example, we noticed that one post was a couple inches off from in inline with the others, but we had already poured the concrete. Therefore, we just had to leave it. Luckily, the horse wire fencing is pretty forgiving.
Attaching the Horse Wire Fencing
With the posts set, all we needed to do was attach the horse wire fencing. However, with rolls weighing over a hundred pounds and me working all through the week, it was harder to do than we thought.
Phil dug a bit of a trench the whole length so that we could bury the bottom of the fence down about 6″. Kona definitely digs for fun, but when he’s alone he can get really determined to escape. One day, we came home to find he had ripped a foot wide hole in our wooden fence in San Diego.
Phil lifted the first panel himself, only to second guess our decision to NOT buy a fence stretcher. With the long length of wire fencing, it looked uneven and wobbly. Then, we had the idea to use some ratchet straps we bought to move our motorcycle. Phil wrapped the straps around a couple rectangles in the horse wire fencing and the anchor post. With one end stapled down, he torqued down the far end. Under the tension, the post started leaning, but all the lines were even. We stapled down the fencing down to the posts then moved to the second leg of the L.
Even though the second line was longer, it was far easier after the first experience. We backfilled the trench and tamped it down.
Now, all we have to do is add functional and aesthetic finishing touches, but at least now, Kona can romp around in the backyard without being on a leash.